Deploy Django Projects on cPanel: The Ultimate Python Hosting Guide 2024

Welcome to Protozoa Host’s “Deploy Django Projects on cPanel: The Ultimate Python Hosting Guide”. If you’re creating websites with Django, which is a tool for making websites with Python, and you want the world to see your work, you’re in the right place. Here at Protozoa Host, we’ll guide you on how to use cPanel, a handy tool for managing websites, to make your Django projects live and accessible to everyone.

This guide is made to be simple and easy to understand, perfect for anyone who’s new to Django, cPanel, or both. We’ll walk you through the steps to move your project from your computer to the web with Protozoa Host. From choosing the right hosting plan with us to setting up your project in cPanel, we’re here to help you every step of the way.

By the end of this guide, you’ll find that getting your Django project up and running on the web with cPanel is not just doable, but also easy and straightforward with Protozoa Host’s support. Let’s dive in and take your Django project to the next level, making it available for the world to see.

Getting Started: Django Deployment and Python Hosting on cPanel

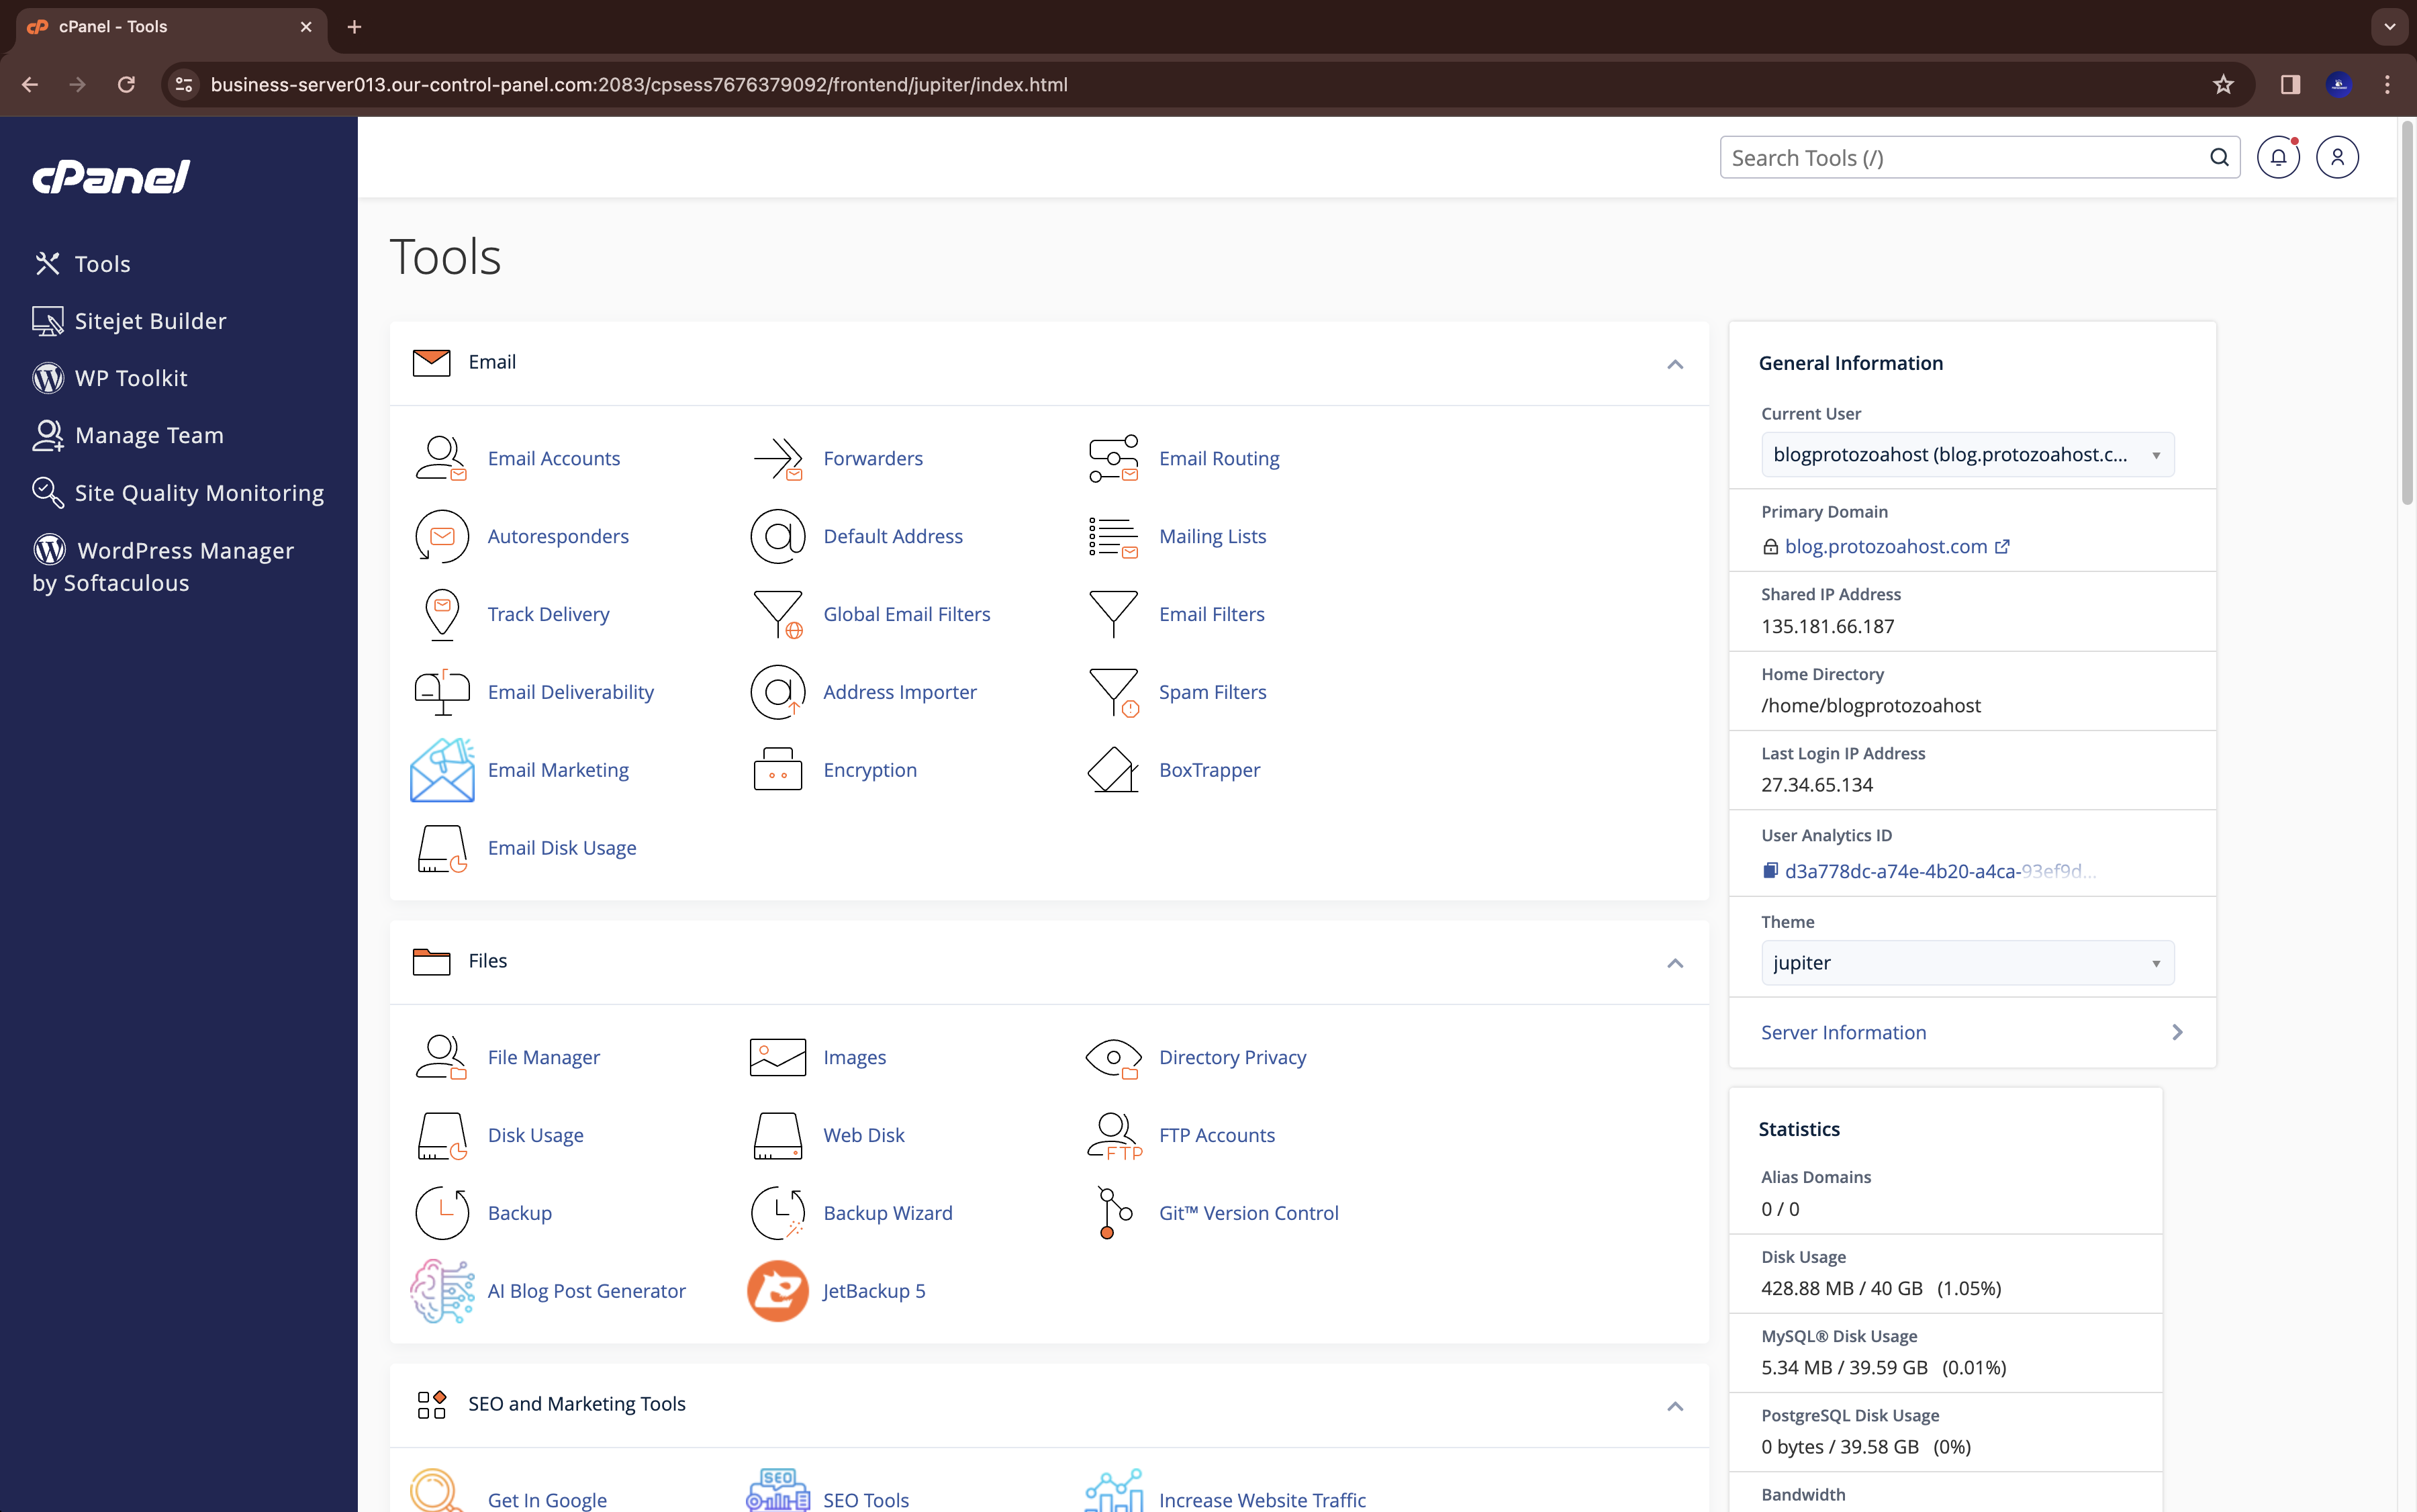
Before you can begin the process of deploying your Django project, the first step is to log into your cPanel account. If you’re hosting with Protozoa Host, you’ll find the login details for your cPanel account in the welcome email we sent you when you signed up. If you can’t find this information, feel free to reach out to our support team for assistance.

Step 1: Log in to Your cPanel Account – Python Hosting

  1. Navigate to the cPanel login page: You can usually access this by adding /cpanel at the end of your website’s URL (for example, http://yourwebsite.com/cpanel) or by entering the direct link provided in your welcome email.
  2. Enter your username and password: These were provided to you by Protozoa Host when you first signed up. If you’ve changed your password and can’t remember it, use the “Forgot Password” link to reset it.
  3. Click the ‘Log In’ button: Once you’ve entered your credentials, press the ‘Log In’ button to access your cPanel dashboard. Here, you’ll find all the tools you need to manage your website and prepare for your Django project deployment.
Login To cPanel - Python Hosting
Login To cPanel – Python Hosting

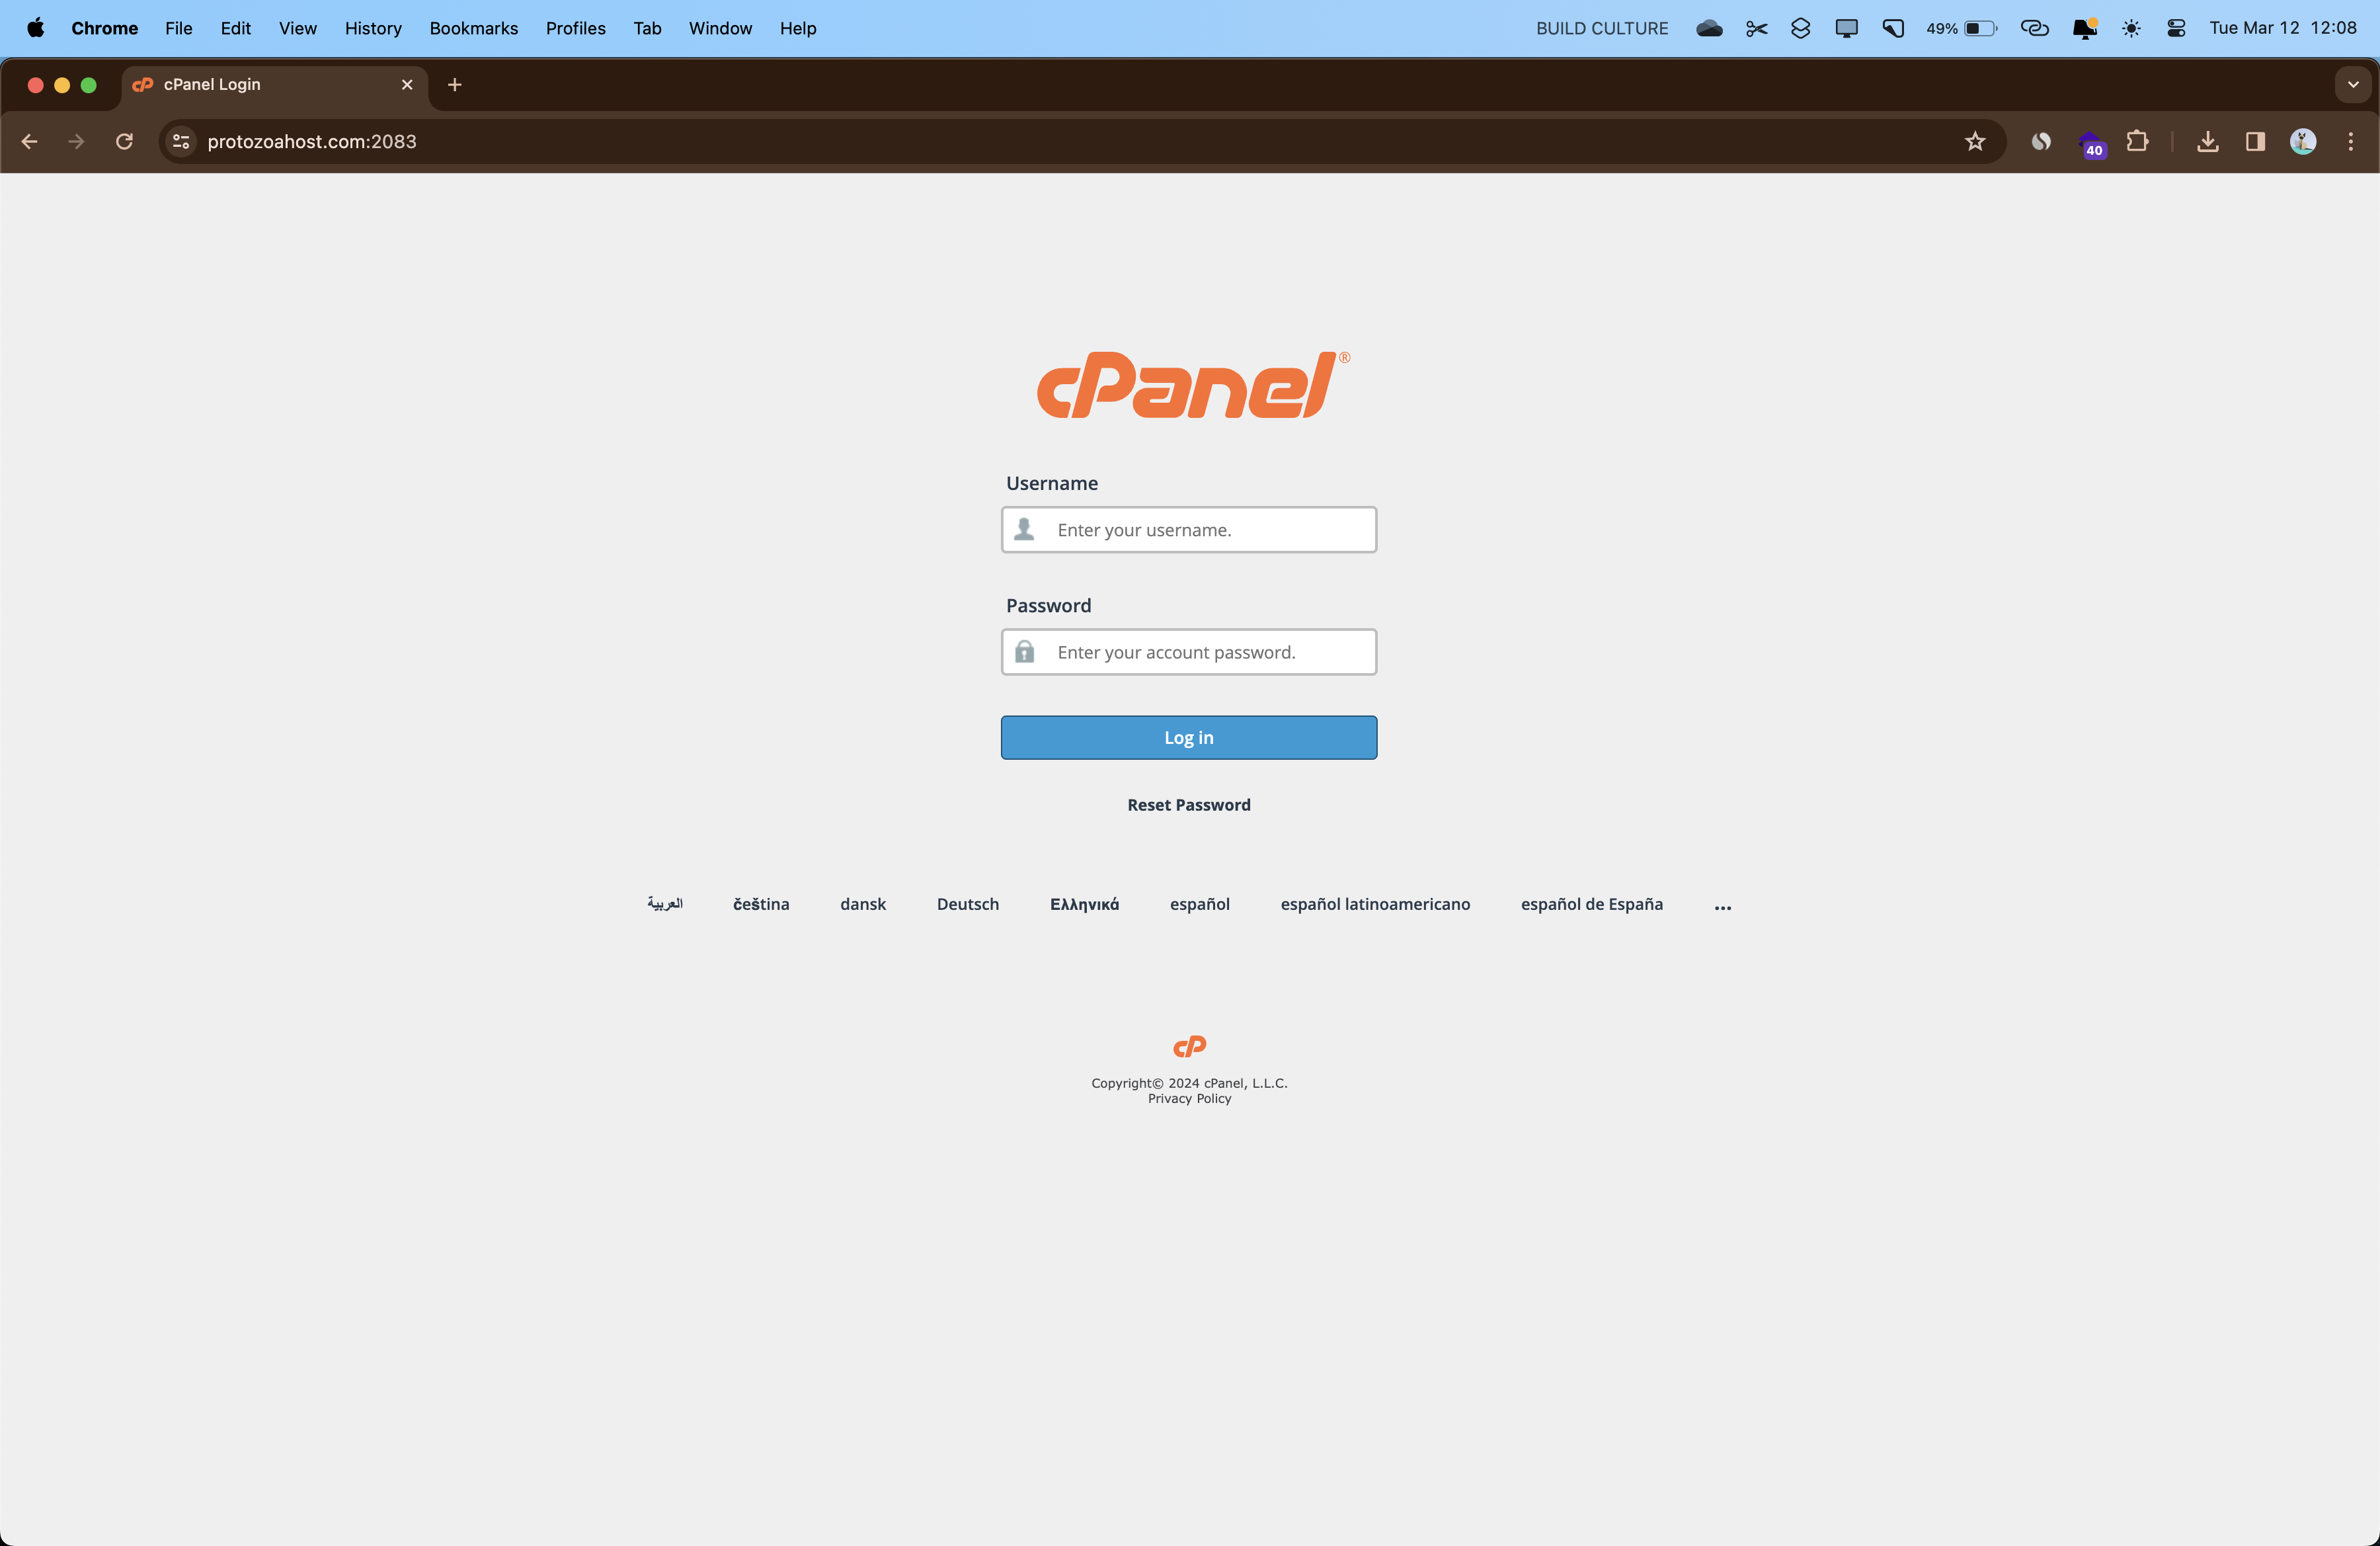
Remember, your cPanel dashboard is the control center for your hosting account, offering access to file management, databases, email accounts, and more. Familiarize yourself with the layout and tools available to you, as they will be instrumental in the deployment process.

Step 2: Locate the Python Selector in cPanel – Python Hosting

cPanel Dashboard - Python Hosting
cPanel Dashboard – Python Hosting

Once you’re logged into your cPanel account, the next step is to find the Python application manager, often referred to as the “Python Selector”. This tool allows you to manage Python applications and environments directly from cPanel, making it essential for deploying your Django project.

  1. Go to the Software Section: Scroll through your cPanel dashboard until you find the “Software” section. This is where cPanel groups tools related to software installations and configurations, including the Python Selector.
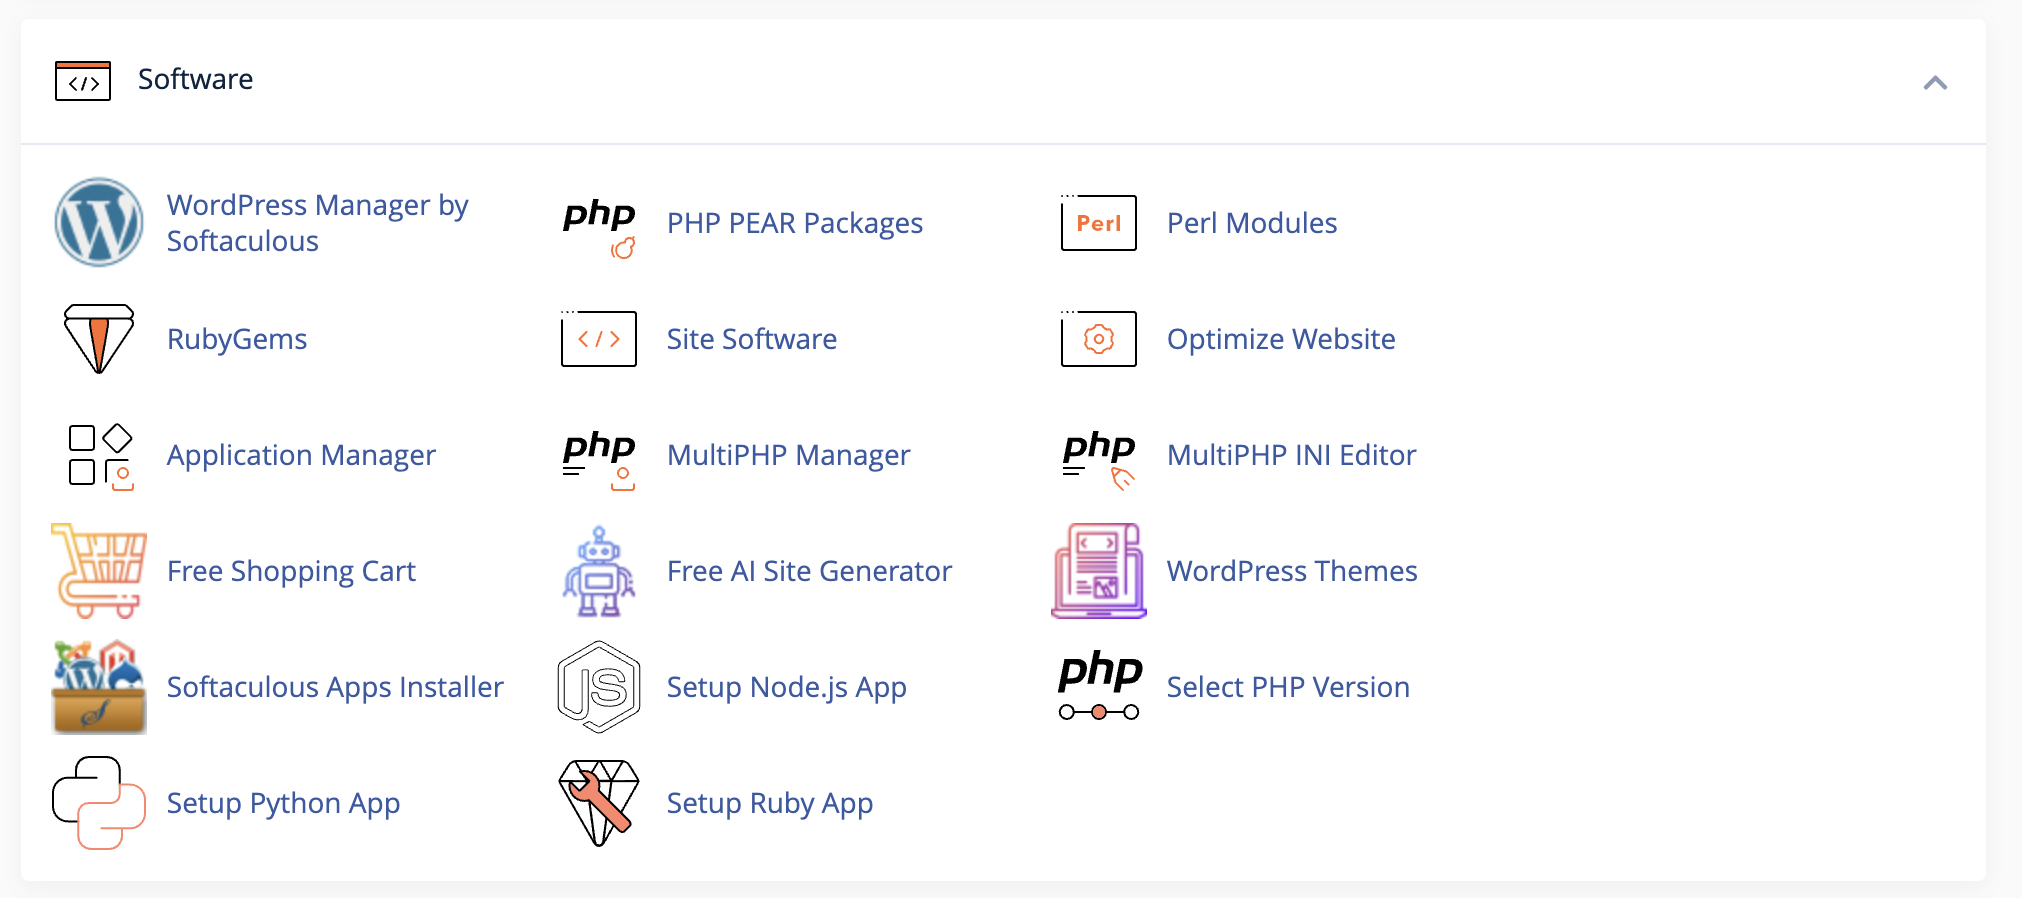
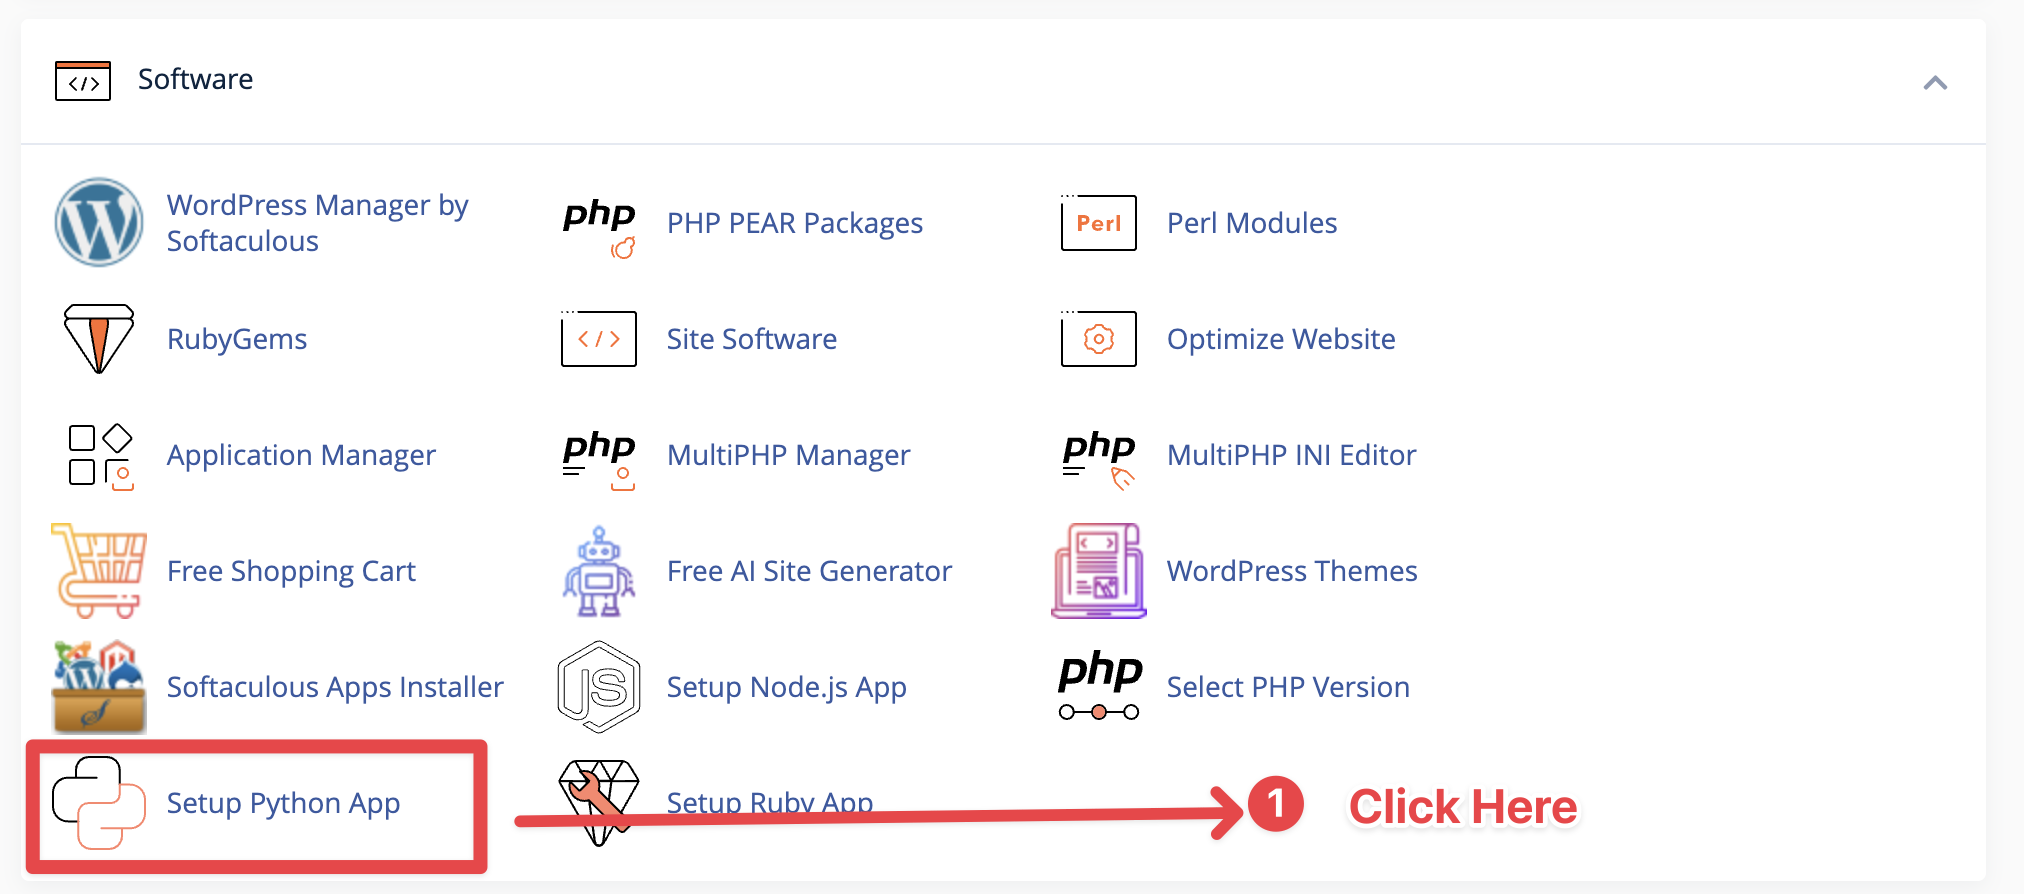
    Software Tab- Python Hosting
    Software Tab- Python Hosting
  2. Click on the Python Selector: Look for an icon or link labeled “Setup Python App”, “Select Python Version”, or simply “Python Selector”. The exact naming can vary depending on your hosting provider and the version of cPanel they are using. Clicking on this link will take you to the Python application management interface.

    Python Selector - Python Hosting
    Python Selector – Python Hosting
  3. Familiarize Yourself with the Python Selector: Once you’re in the Python Selector interface, take a moment to familiarize yourself with its layout and features. Here, you can create new Python environments, manage existing ones, and set up various Python applications, including Django.

Finding the Python Selector is a crucial step in preparing your cPanel account for Django deployment. It’s the gateway to setting up the right environment for your project, ensuring that all the necessary dependencies and versions are in place for a successful launch.

Step 3: Create a New Python Application in cPanel

Now that you’ve located the Python Selector in your cPanel, it’s time to create a new Python application:

Python Selector Create Application - Python Hosting
Python Selector Create Application – Python Hosting

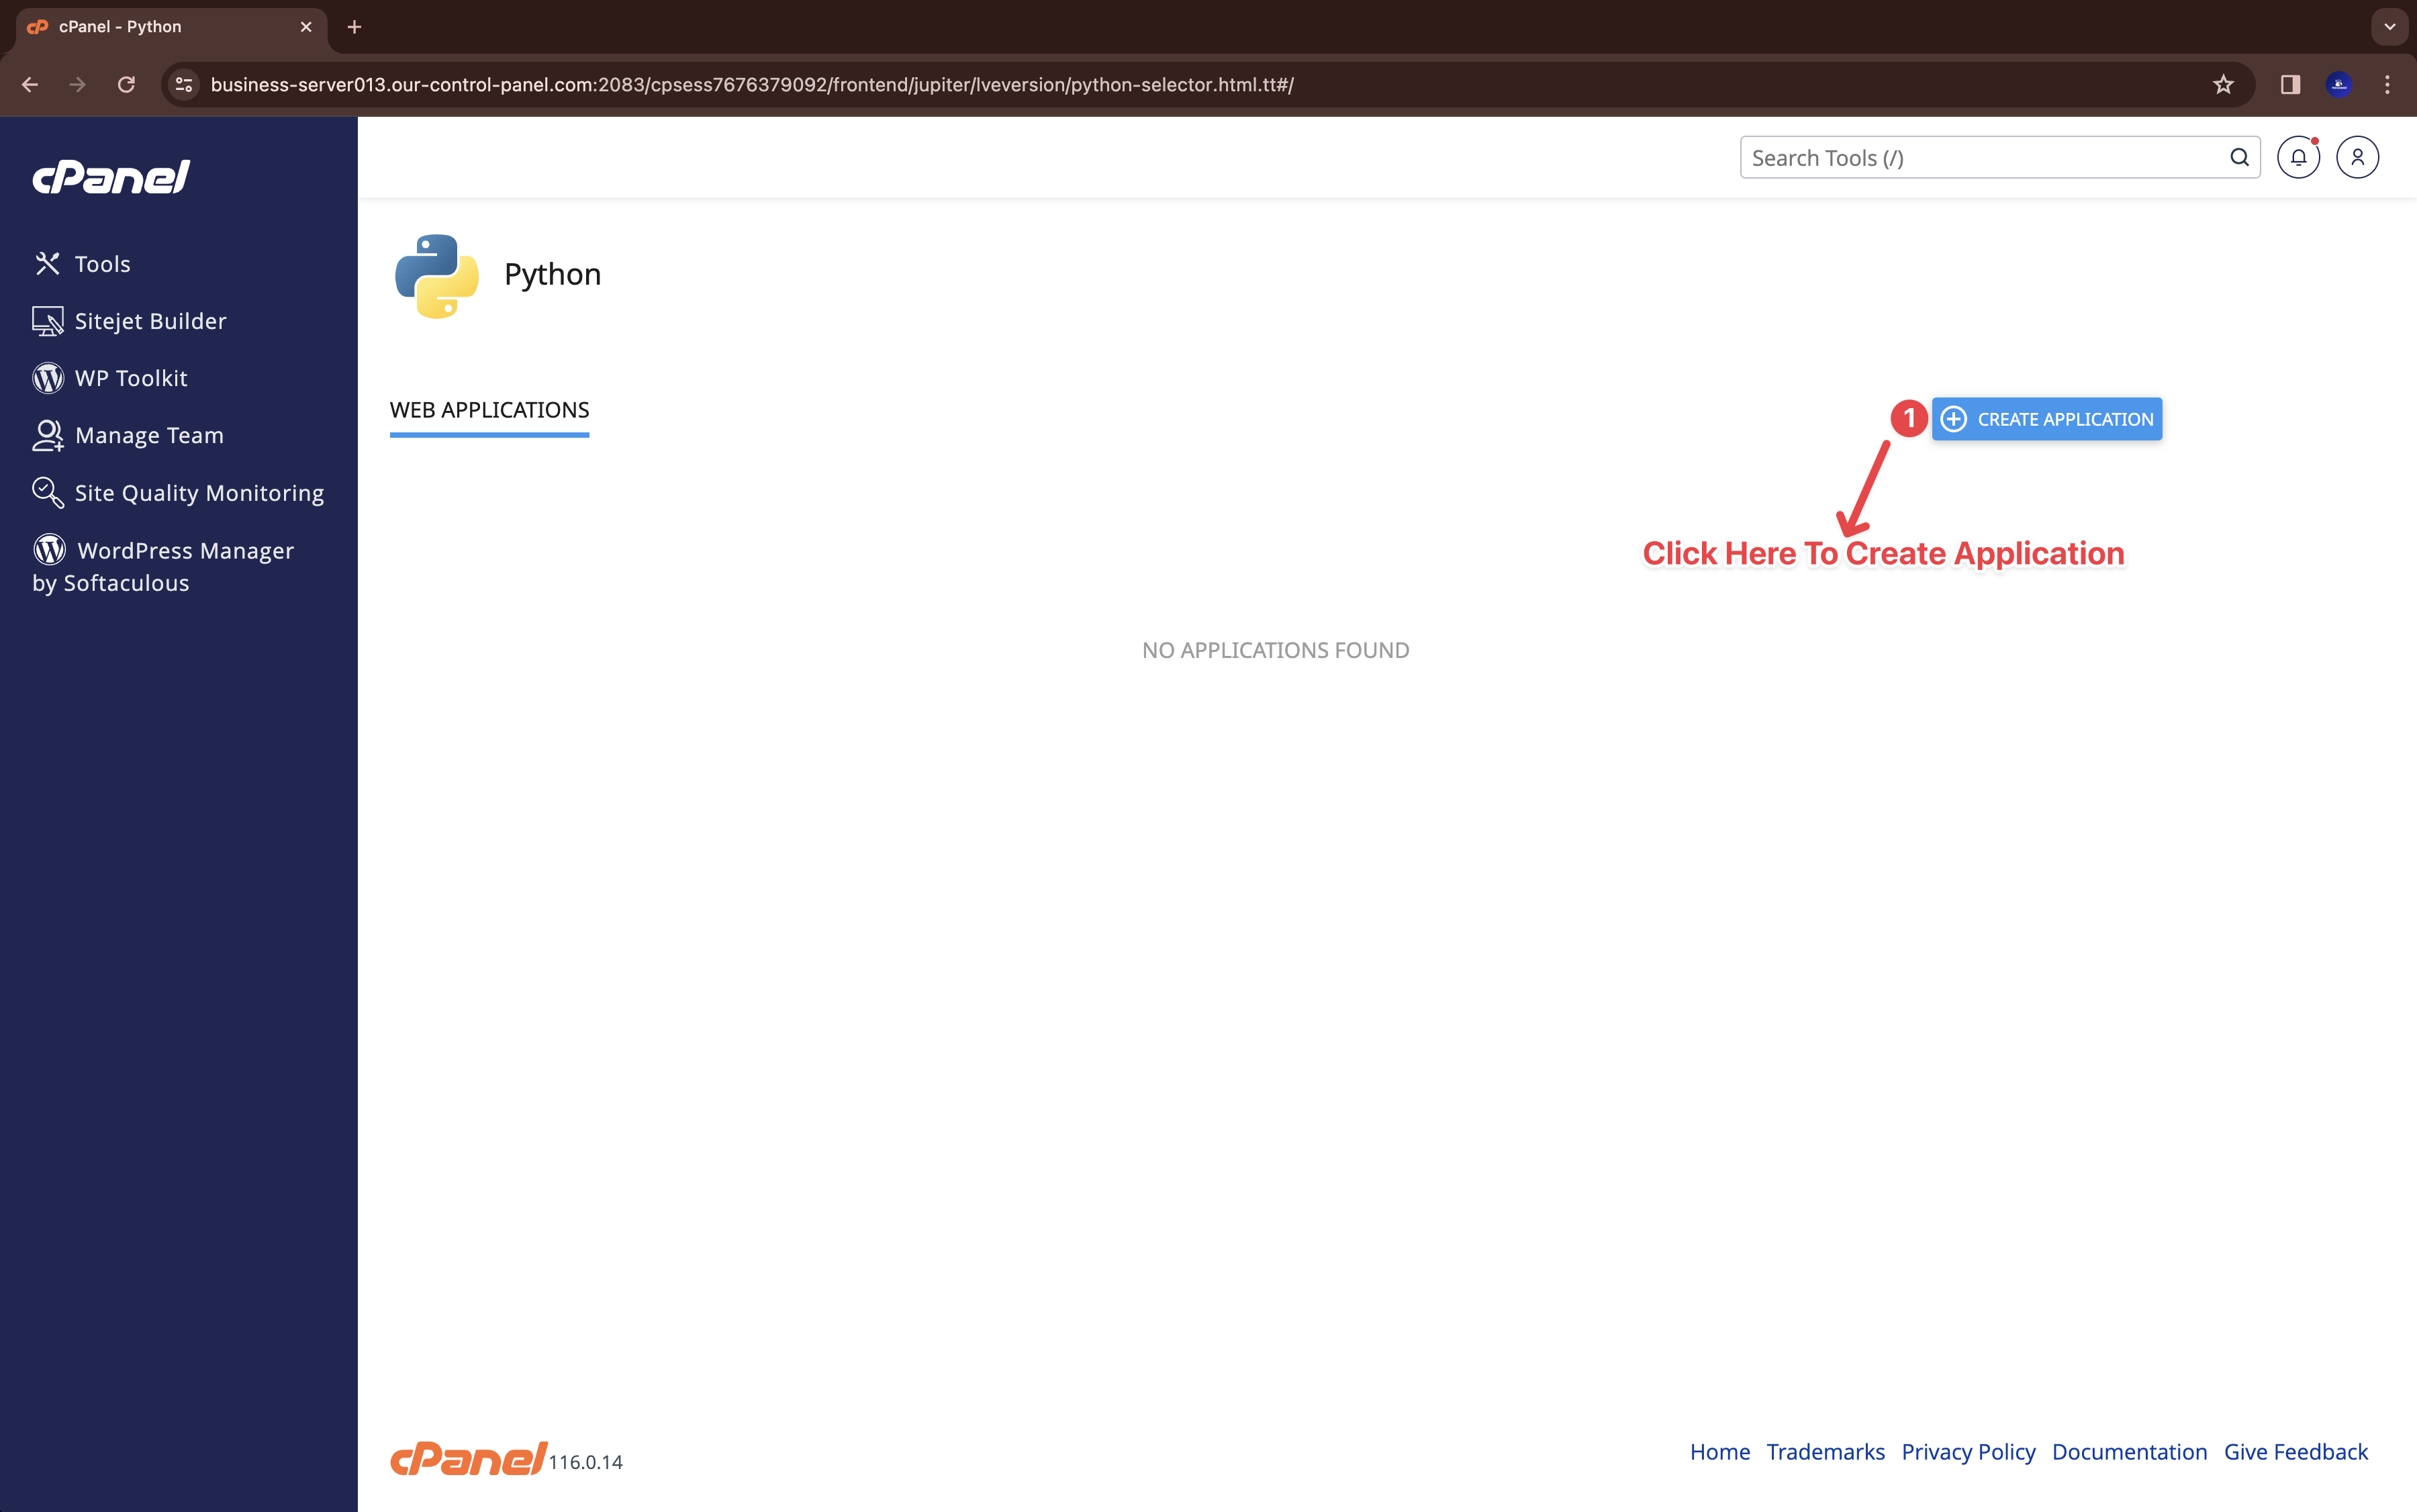
Click on the ‘Create Application’ Button: In the Python Selector interface, you will see a button labeled ‘Create Application’. It’s typically prominent, often located towards the top right of the section. Click this button to begin setting up your new Python environment.

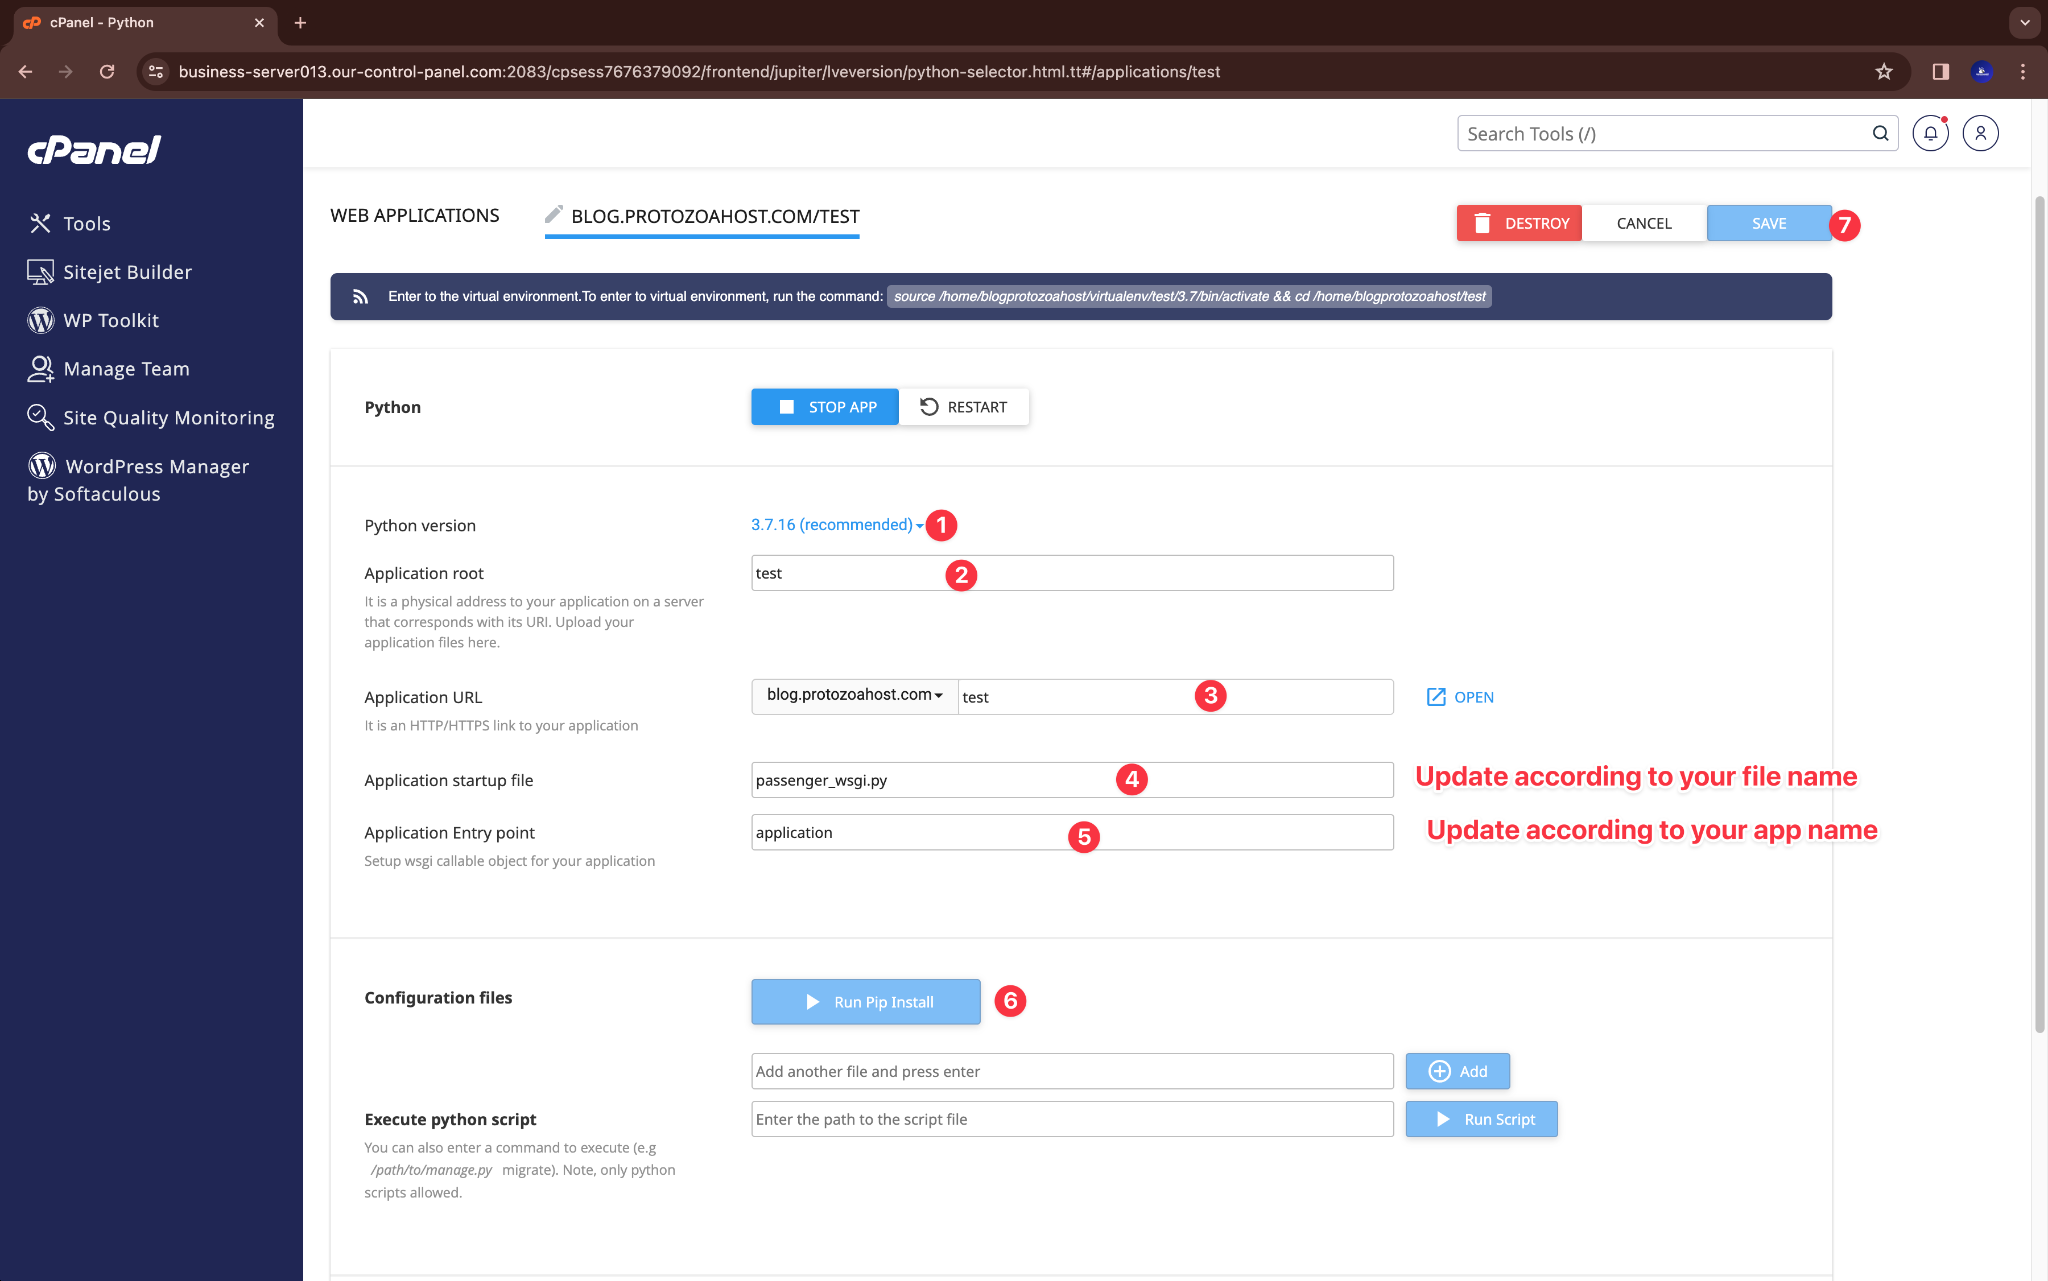
Step 4: Selecting the Correct Python Version for Python Hosting

For successful Python hosting, it’s crucial to select the appropriate Python version that is compatible with your Django application. The Python Selector in cPanel offers a range of versions, and choosing the right one is a key step in the deployment process.

Python Version - Python Hosting
Python Version – Python Hosting
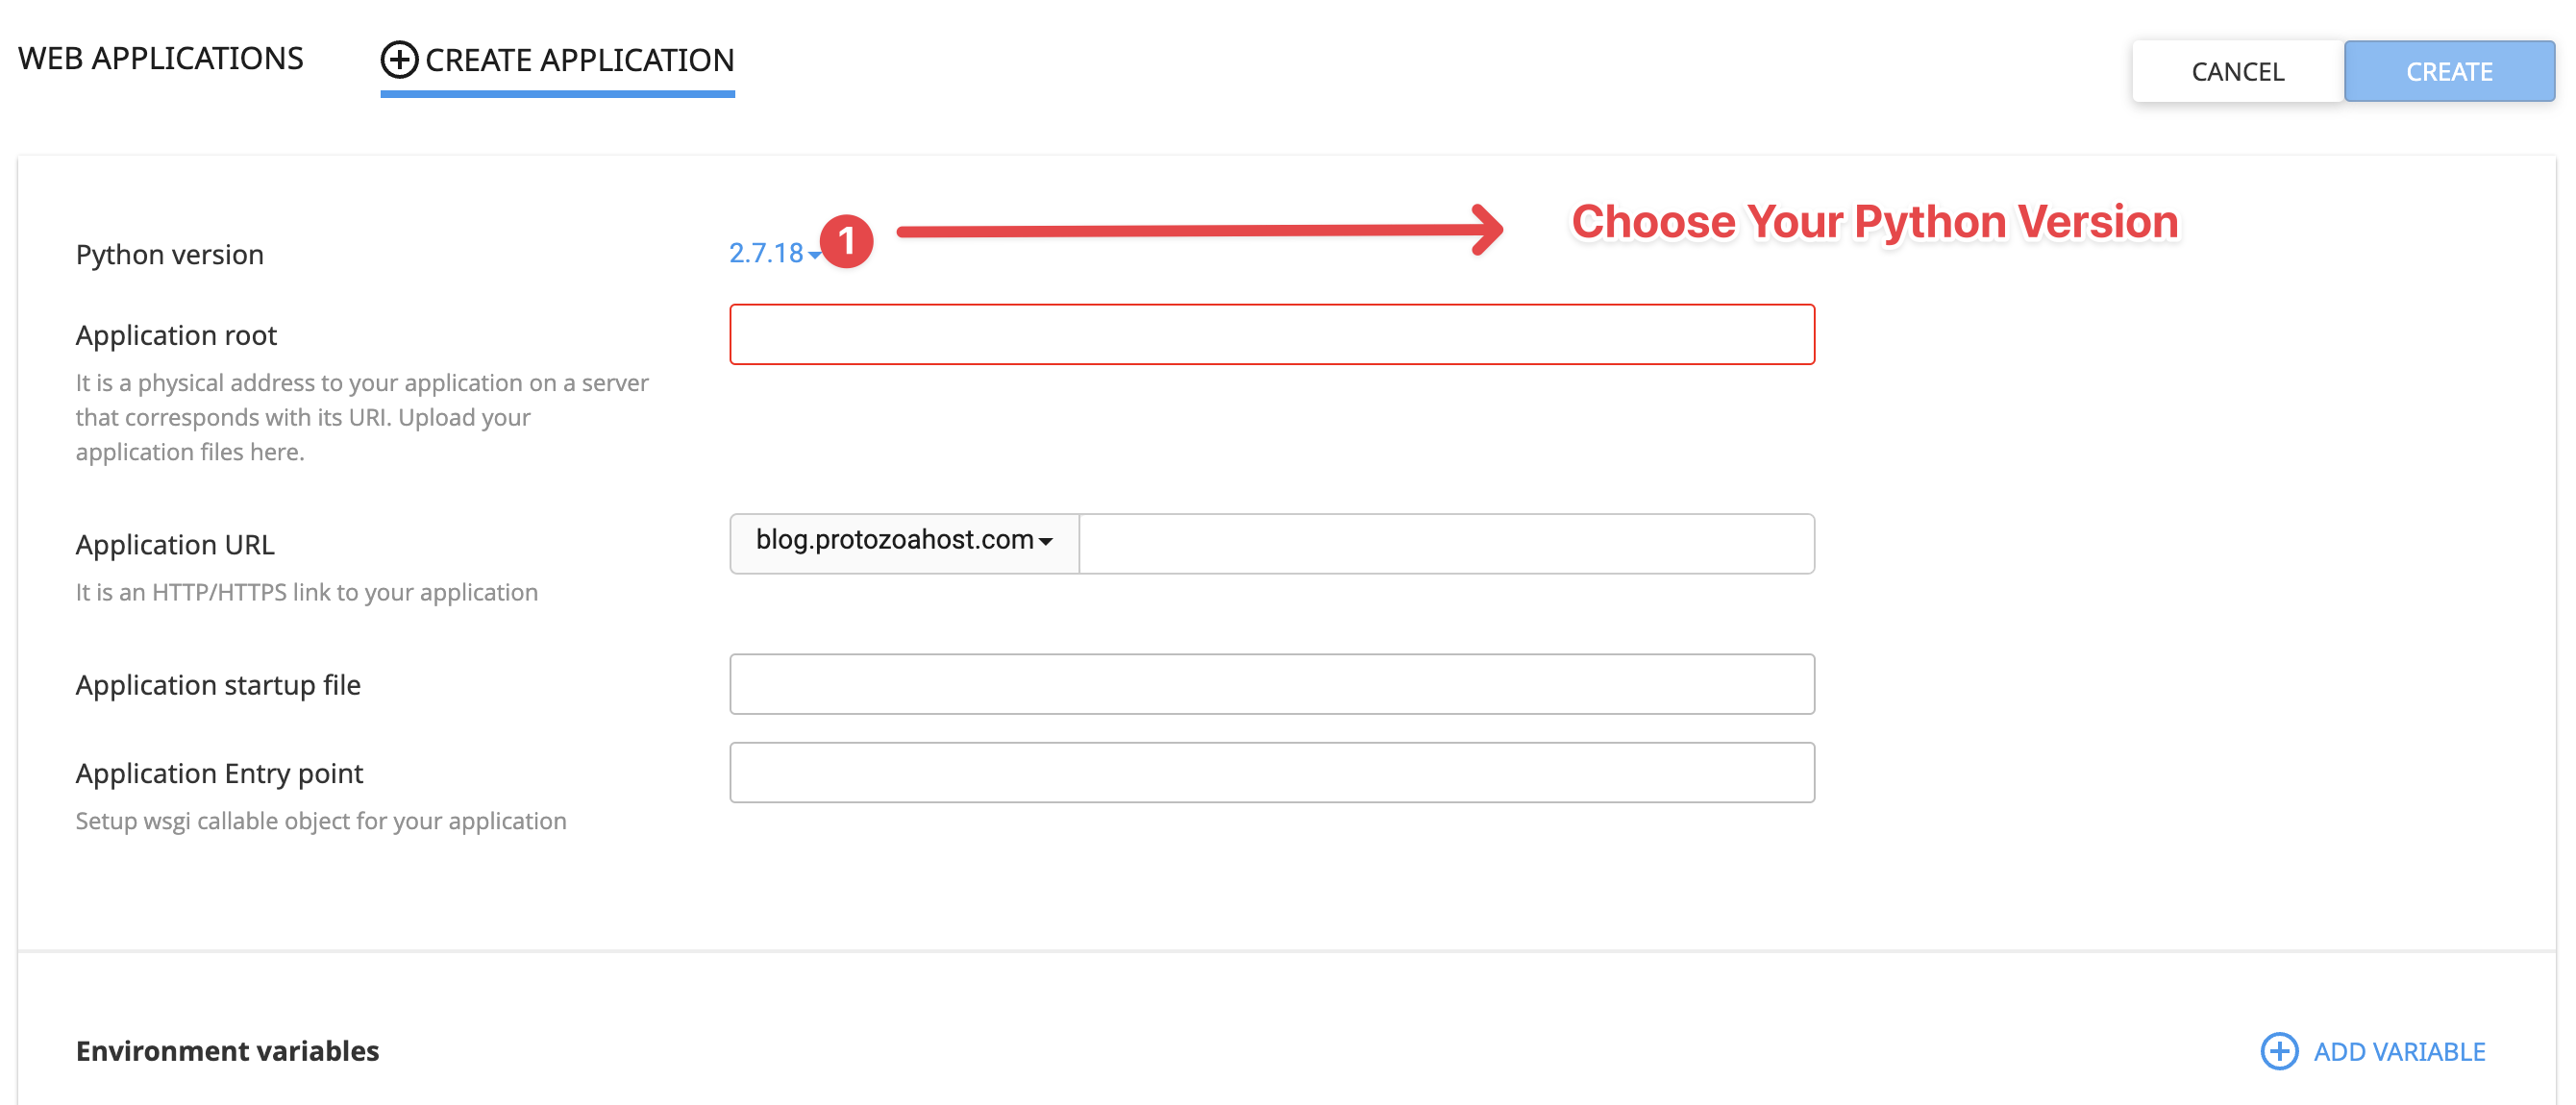
  1. Open the Python Version Dropdown: In the Python application setup interface, click on the dropdown menu that shows the Python version. This will display a list of available Python versions supported by your cPanel Python hosting environment.

    Select Python Version - Python Hosting
    Select Python Version – Python Hosting
  2. Choose the Python Version for Your Django Project: Django applications typically specify the Python version they are compatible with. Select the version that matches your project’s requirements. For modern Django applications, Python 3.7 or newer is often recommended, so choose a version like 3.7.16 (or the version recommended by your application) for optimal Python hosting performance.
  3. Confirm the Python Version for Your Hosting: Once you’ve selected the correct version, it will be set for your Python application. This ensures that your Python hosting environment is perfectly tailored to your Django project, leading to a more stable and secure deployment.
  4. Apply the Python Version to Your Hosting Setup: After selecting the version, the cPanel Python Selector will update the application’s environment. This process tailors the Python hosting environment, making sure it’s ready for your Django project.

     Python Version Selected - Python Hosting
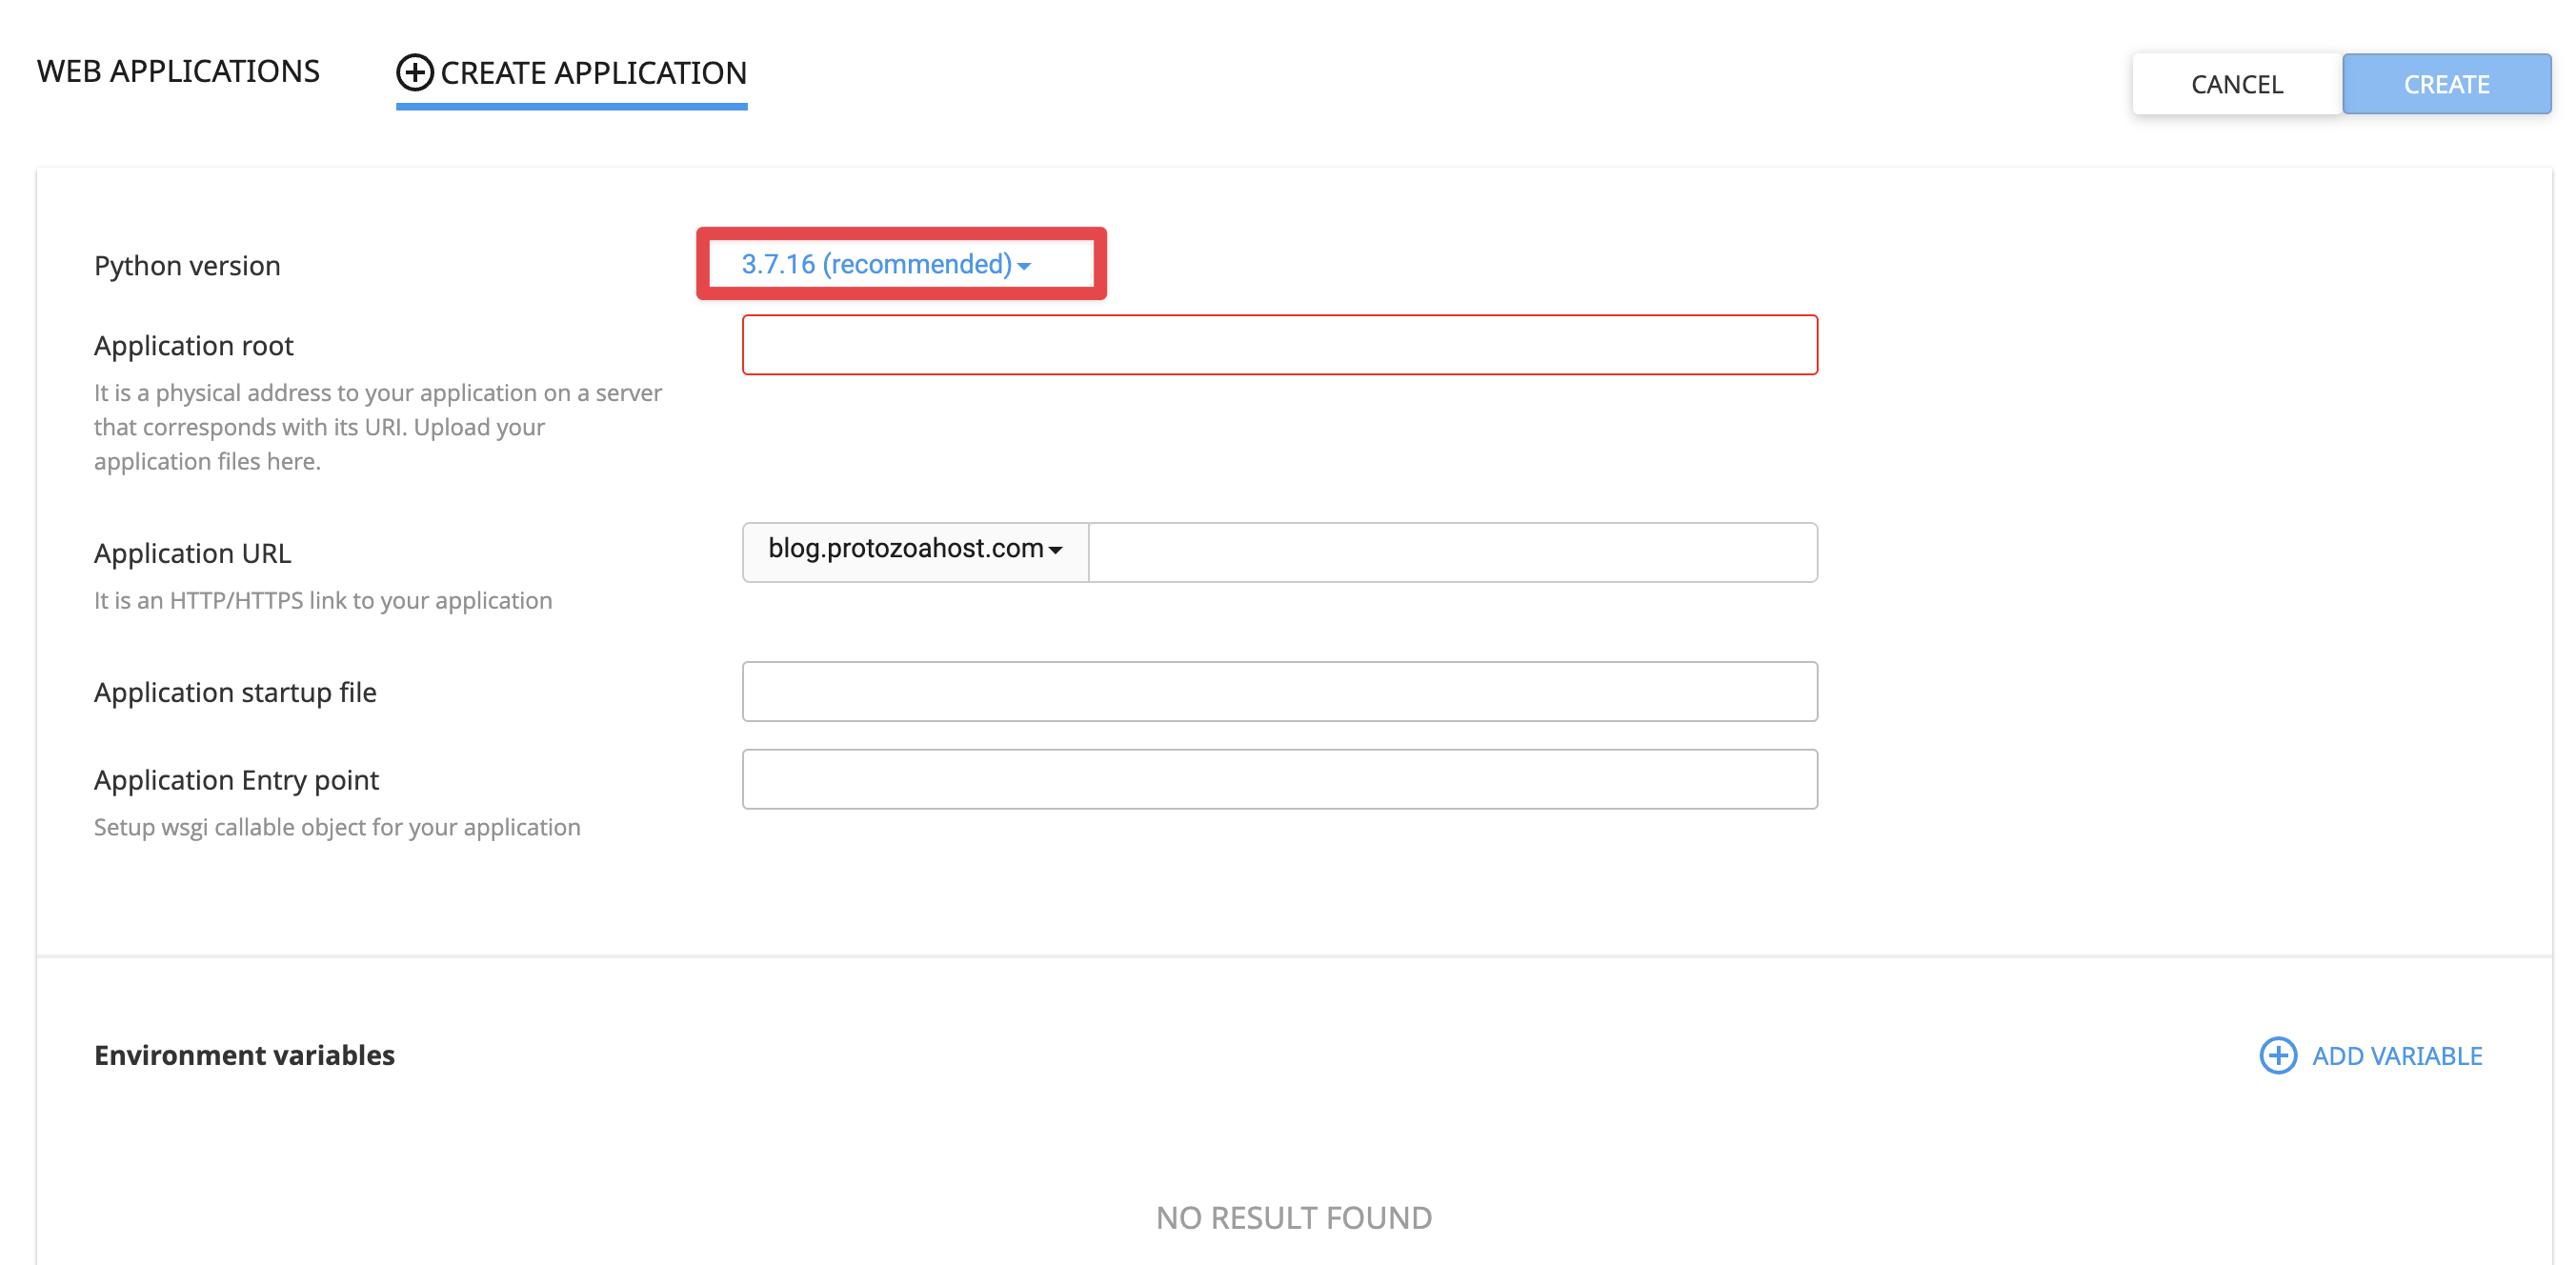
    Python Version Selected – Python Hosting

Remember, the Python version you choose will affect the compatibility of the libraries and frameworks you plan to use. Ensuring that the Python hosting environment matches the requirements of your Django project is essential for a seamless deployment on cPanel.

Step 5: Configuring Your Django Application for Python Hosting

After selecting the right Python version for Python hosting, the next step involves configuring your Django application in cPanel.

Configuration - Python Hosting
Configuration – Python Hosting
  1. Set the Application Root: This is the physical address on the server where your Django project files will reside. Input the directory name you wish to use. For example, if you enter ‘test’, your Django project will be located in a folder named ‘test’ inside your public_html directory.
  2. Determine the Application URL: This will be the web address where users can access your Django application. It’s automatically formed based on the application root you provide. For instance, if your domain is blog.protozoahost.com and you set your application root to ‘test’, the application URL will become blog.protozoahost.com/test.
  3. Specify the Application Startup File: The startup file will be the point of entry for your application. For a Django project, this is typically your wsgi.py file. You need to provide the path relative to your application root, like test/myproject/wsgi.py.
  4. Enter the Application Entry Point: In this field, you will define the callable object for your WSGI-compatible web application, which is usually something like myproject.wsgi:application.
  5. Create the Application: After filling out all the necessary details, click on the ‘Create’ button to finalize the configuration of your Python hosting environment.

With these configurations, you are setting up a tailored environment within your cPanel Python hosting that will support your Django project. This step is vital to ensure that the Python hosting setup aligns with the specifics of your Django project for optimal functionality.

Step 6: Verify Your Python Installation for Python Hosting

With your Python environment configured, it’s essential to verify the setup to ensure everything is correctly installed for your Python hosting. Here’s how to check that your Python application is running:

  1. Access the Application URL: Click on the provided link within your cPanel Python application setup, which directs to your application’s URL. This is the address where your Django application is hosted. For instance, blog.protozoahost.com/test.

    Verify Python Environment - Python Hosting
    Verify Python Environment – Python Hosting
  2. Check the Python Version Display: If the installation is successful, you should see a default hosting page indicating “It works!” along with the Python version that is currently active for your Python hosting, such as “Python 3.7.16”. This page confirms that the Python environment is operational.
  3. Verify the Python Environment: The cPanel interface provides a command to enter your virtual environment. Running this command through an SSH session will activate your Python hosting environment, allowing you to perform further configurations or installations required for your Django project.
  4. Confirm Functionality: If the test page correctly displays the Python version, it means your Python hosting environment is set up correctly and you are ready to proceed with deploying your Django project files.

    Verify Python Environment - Python Hosting
    Verify Python Environment – Python Hosting

This verification step is a good indication that your Python hosting setup on cPanel is correct and that you can move forward with confidence to the next steps in deploying your Django application. If you encounter any issues, it’s a good time to troubleshoot or contact your hosting provider’s support team for assistance.

Step 7: Configure the passenger_wsgi.py File and Application Name

Python Hosting Configuration

With your Python environment set up, the next step is to configure the passenger_wsgi.py file and the application name to align with your Django project’s requirements for Python hosting.

  1. Update the passenger_wsgi.py File: The passenger_wsgi.py file serves as the entry point for your Python application. This file needs to be correctly configured to point to your Django project’s WSGI application. You will typically edit this file to import your Django application’s WSGI module and specify the correct application callable.
  2. Edit the File to Suit Your Django Application: Inside the passenger_wsgi.py file, you should have something similar to the following:

<span class="hljs-keyword">import</span> sys, os

# Add your project directory to the sys.path
project_home = ‘/path/to/your/django/project’
if project_home not in sys.path:
sys.path.append(project_home)

# Set environment variable to tell django where your settings.py is
os.environ[‘DJANGO_SETTINGS_MODULE’] = ‘your_django_project.settings’

# Import your Django application
from django.core.wsgi import get_wsgi_application
application = get_wsgi_application()

Replace '/path/to/your/django/project' with the actual path to your Django project within your hosting space, and 'your_django_project.settings' with the appropriate settings module for your Django application.

  1. Set the Application Name: In the cPanel Python application interface, ensure the Application Entry point is set to application, which is the callable object created in the passenger_wsgi.py file.
  2. Save Your Changes: After making the necessary updates to the passenger_wsgi.py file and confirming the application name, be sure to click the ‘Save’ button (number 7 in your screenshot) to apply these changes to your Python hosting setup.

These steps are crucial as they direct the web server to your Django application, allowing it to serve your web pages to visitors. Once this configuration is done, your Python hosting environment is properly set to run your Django project on cPanel.

Step 8: Activate the Virtual Environment for Python Hosting

To get your Django application running smoothly, activating the virtual environment through the cPanel terminal is a must. This step ensures that you’re working with the correct Python and Django versions required by your application. Here’s how to do it:

Copy Virtual Environment Syntax - Python Hosting
Copy Virtual Environment Syntax – Python Hosting
  1. Access the cPanel Terminal: In your cPanel dashboard, look for the “Terminal” icon. You might find it quickly in the “Advanced” section. Click on it to open the in-browser command-line interface.

    Terminal Search - Python Hosting
    Terminal Search – Python Hosting
  2. Prepare the Activation Command: Your cPanel’s Python app setup page provides a snippet of code that’s meant for activating the virtual environment. It will typically look something like this: source /path_to_virtualenv/activate. Copy this command.

    Entering Virtual Environment in Terminal
    Entering Virtual Environment in Terminal
  3. Launch the Virtual Environment: Right-click to paste the command into the cPanel terminal, or use keyboard shortcuts (Ctrl+V for Windows/Linux, Cmd+V for Mac). Hit Enter to execute the command.
  4. Confirm Activation: You’ll know the environment is active when you see its name in parentheses at the beginning of the command prompt line in the terminal.
  5. Work Inside the Virtual Environment: With the virtual environment active, you can now run Python commands, install dependencies, or perform any necessary operations for your Django project.

Activating your virtual environment is a key step in Python hosting, as it ensures that all subsequent commands and installations are localized to your project, maintaining the integrity and consistency of your Python hosting environment on cPanel.

Step 9: Install Modules and Set Allowed Hosts in Django Settings

After activating your virtual environment, you’ll need to install necessary Python modules and configure your Django settings for production.

Install Required Python Modules:

  1. Copy Virtual Environment Path: Click on the virtual environment path in the cPanel Python app section to copy it to your clipboard.
  2. Navigate to Your Project Folder: Open the cPanel terminal and change to the directory containing your Django project using the cd command followed by the path to your project’s root directory.
  3. Activate Your Virtual Environment: Paste the environment path you copied into the terminal. It will look like this: source /path_to_virtualenv/bin/activate. Press Enter to activate it.
  4. Install Modules: With the virtual environment activated, install your project’s dependencies by running the command pip install -r requirements.txt. Make sure your requirements.txt file is in the root directory of your Django project or provide the path to it.

Finalize Django Settings:

  1. Edit settings.py for Production: In your project’s settings.py file, you’ll need to adjust the ALLOWED_HOSTS setting to specify which hosts/domain names your Django site can serve. This is a security measure to prevent HTTP Host header attacks.
  2. Configure ALLOWED_HOSTS: You can either allow all hosts by setting ALLOWED_HOSTS = ['*'], which is fine for testing but not recommended for production due to security concerns. Alternatively, specify your domain name like ALLOWED_HOSTS = ['www.yourwebsiteurl.com'] to restrict it to your domain.

By following these steps, you’ll ensure that your Django project’s environment is properly configured and secure for Python hosting on cPanel. With the modules installed and the ALLOWED_HOSTS configured, your Django application is almost ready to go live.

Step 9: Configure Static and Media Files for Django in Production

When moving from development to production, setting up static and media files correctly is essential for your Django project to function correctly on your Python hosting environment. Here’s how to configure them:

Before Configuration (Typical Development Settings)

STATIC_URL = <span class="hljs-string">'/static/'</span>
STATICFILES_DIRS = [BASE_DIR / <span class="hljs-string">'static'</span>]
STATIC_ROOT = BASE_DIR / <span class="hljs-string">'staticfiles'</span> <span class="hljs-comment"># This needs to be changed for production</span>
MEDIA_URL = <span class="hljs-string">'/media/'</span>
MEDIA_ROOT = BASE_DIR / <span class="hljs-string">'media'</span> <span class="hljs-comment"># This also needs to be changed for production</span>

Understanding the Settings:

  • STATICFILES_DIRS lists the directories where Django looks for additional static files, besides the static directory in each app.
  • STATIC_ROOT is the directory where static files are collected when you run python manage.py collectstatic. This should be an empty directory dedicated to static files in production.
  • MEDIA_ROOT is the directory where user-uploaded files are stored.

After Configuration (Production Settings):

STATIC_URL = <span class="hljs-string">'/static/'</span>
STATICFILES_DIRS = [BASE_DIR / <span class="hljs-string">'static'</span>]
<span class="hljs-comment"># Replace 'BASE_DIR' with the absolute path of the application folder inside your domain or subdomain</span>
STATIC_ROOT = <span class="hljs-string">'/home/username/www.yourwebsiteurl.com/appname/staticfiles'</span>
MEDIA_URL = <span class="hljs-string">'/media/'</span>
<span class="hljs-comment"># Same replacement for 'BASE_DIR' with the absolute path for media files</span>
MEDIA_ROOT = <span class="hljs-string">'/home/username/www.yourwebsiteurl.com/appname/media'</span>

Step-by-Step Configuration:

  1. Locate Your Project’s Application Folder: Find the absolute path where your Django project resides within your hosting environment. For example, /home1/username/www.yourwebsiteurl.com/appname.
  2. Configure STATIC_ROOT and MEDIA_ROOT: Replace BASE_DIR with the absolute path you identified earlier in both STATIC_ROOT and MEDIA_ROOT. Ensure that the paths you specify point to directories where Django will collect static files and upload media files.
  3. Run collectstatic: Once you’ve updated the settings, run python manage.py collectstatic from the terminal within your virtual environment. This command collects all your static files into the STATIC_ROOT directory.
  4. Verify File Serving: Check if the static and media files are being served correctly by accessing them via their URLs. You might need to adjust your web server’s configuration to serve these files correctly.

Remember, the STATIC_ROOT and MEDIA_ROOT must be writable by the web server and should not be accessible to the public directly for security reasons. This configuration ensures that Django serves static and media files correctly in a Python hosting environment for production.

Wrapping Up Your Django Deployment

You’ve done it! Your Django project is now successfully deployed and ready for visitors on your Python hosting service with Protozoa Host. From configuring your cPanel to setting up your static and media files, you’re all set for production.

Should you encounter any hiccups or have questions about Python hosting, don’t hesitate to contact us at [email protected], drop a message at https://m.me/protozoahost, or visit our contact page at https://protozoahost.com/contact for support. We’re here to ensure that your Python hosting experience is seamless and supportive. Here’s to your Django project’s success on the web!


Leave a Reply

Your email address will not be published. Required fields are marked *